

How to Record a Webinar That Looks and Sounds Great
Zoom, Riverside or a phone: how to set up, what to wear and the settings that matter.
Short answer: get the sound right first, face your light, put the camera at eye level and do a full dry run with the same room, outfit and settings. For anything going public, record on a platform that captures each speaker locally, like Riverside, instead of relying on a Zoom cloud recording. Ten minutes of setup saves hours of fixing it in the edit.
Last updated: November 10, 2026
The short version
- Sound matters more than picture. Use an external mic placed just out of frame. Not AirPods.
- Face your light. A window or lamp in front of you, never behind you.
- Camera at eye level. Stack some books under the laptop. Nobody wants the up-the-nose angle.
- Use a wired internet connection if you can, and close everything you don't need.
- Do a dry run. Same room, same outfit, same settings as the real thing.
- Wait a beat before you start talking and after you finish. Your editor will thank you.
Step 1: Pick the right recording tool
Not all remote recordings are created equal. Here's the honest trade-off.
Zoom (or Teams, or Meet)
Easy, and everyone already has it. The catch: it records the live video stream after it has been squeezed over the internet. That usually means 720p, and if someone's connection dips, their recording dips with it. Fine for internal content and quick turnarounds.
Riverside (or a similar "local recording" platform)
These tools record each person on their own computer in full quality, up to 4K video and uncompressed audio, then upload the files in the background. A bad connection makes the live call choppy, but the recording stays clean. If the webinar is going on your website or YouTube, this is what we recommend.
A phone or tablet
For a solo presenter, a modern phone gives you the best picture of the three. See the phone tips further down.
Step 2: Set up your space
Location and background
- Pick a quiet room. Turn off fans, air conditioning, space heaters and anything that hums. Silence your phone and close the door.
- Tidy the background. Some depth behind you looks better than sitting flat against a wall, but keep it simple. A bookshelf, a plant or a lamp is plenty.
- Skip themed or animated virtual backgrounds. They cut off hands and hair and fight with the edit. If your company provides an approved branded background, use that. Otherwise a real, tidy room wins.
Camera and framing
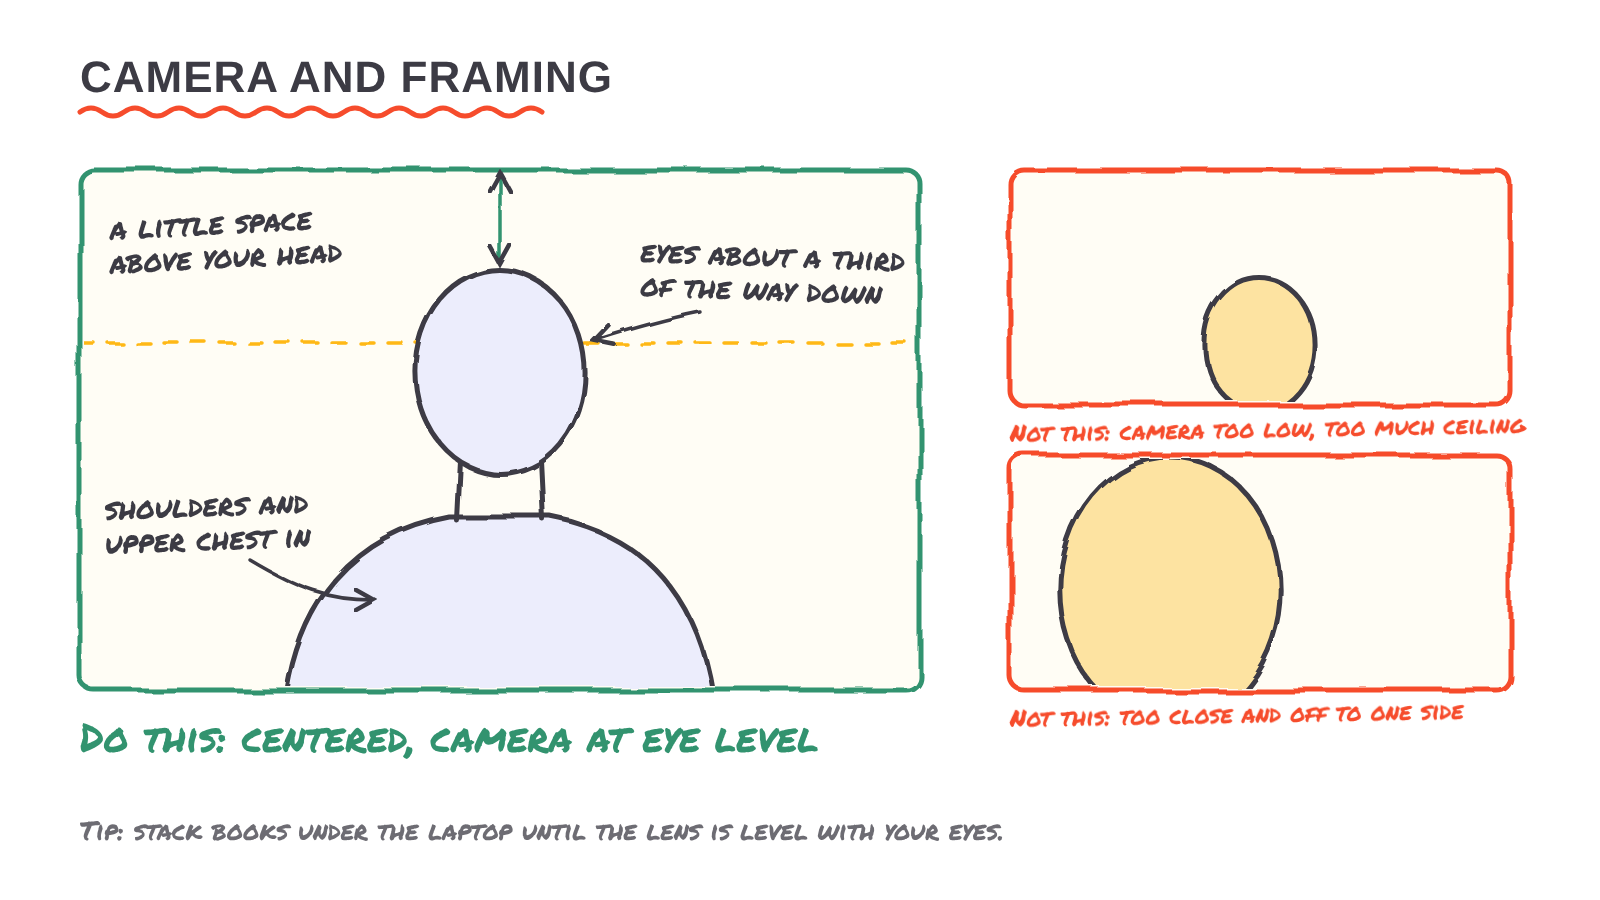
- Put the camera at eye level. Raise your laptop on books or a stand.
- Sit centered, far enough back that your head, shoulders and upper chest are in frame, with a little space above your head.
- Look at the lens, not at yourself or the other speakers on screen. Moving the meeting window right under the webcam helps.
- Wipe the lens. Seriously. Thumbprints are the number one cause of blurry webcam video.
Lighting
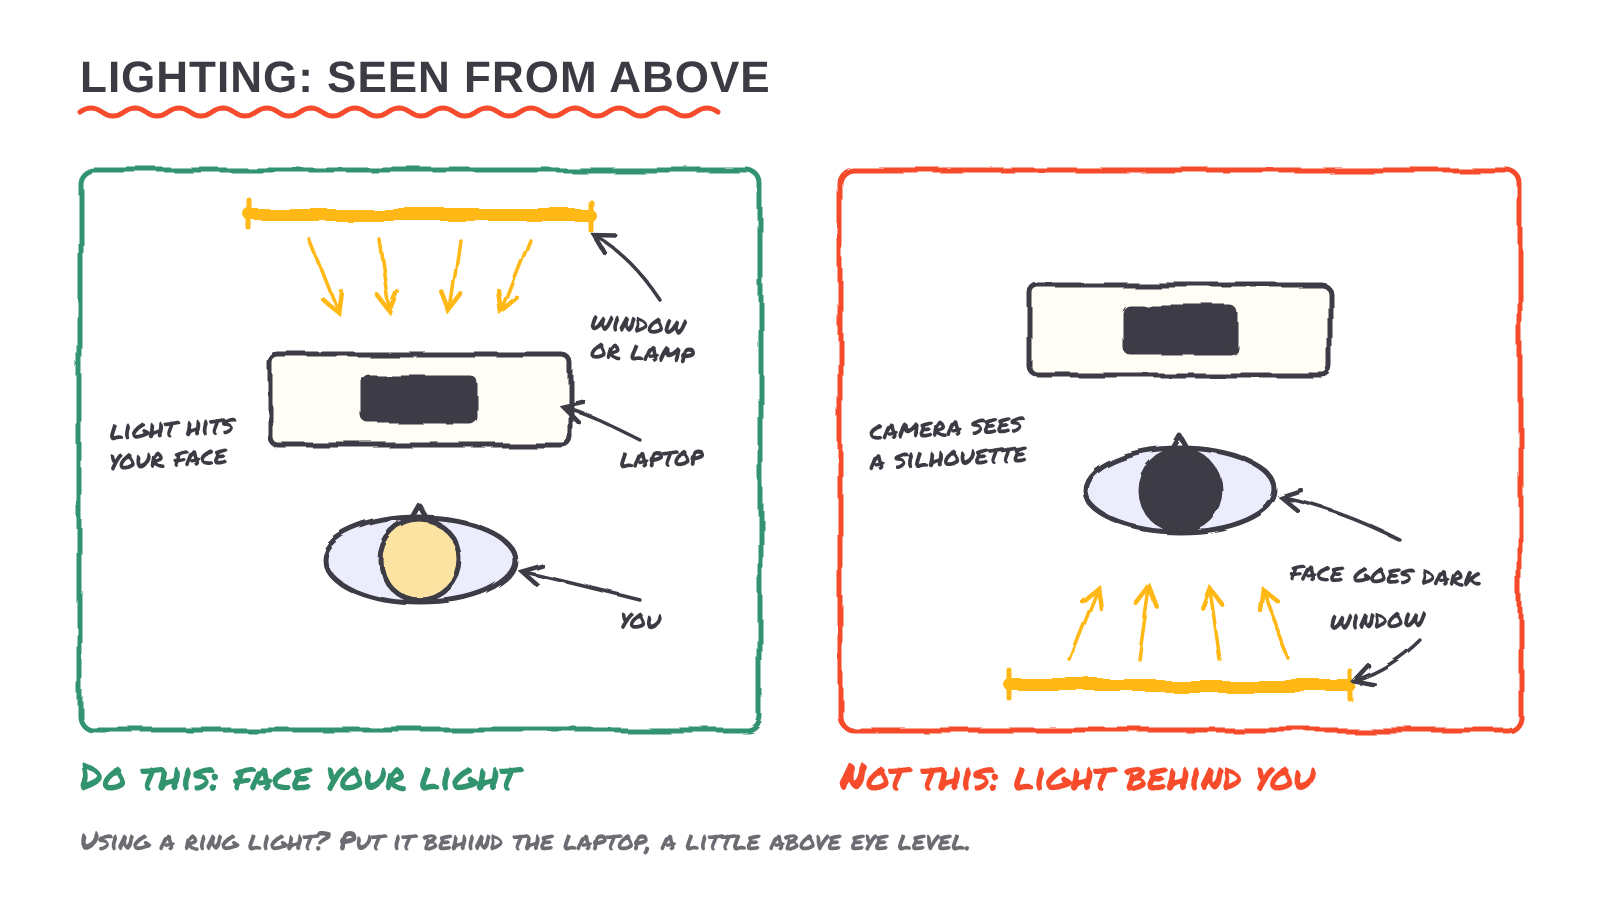
- Face your main light source. A window in front of you is great daylight.
- Never sit with a window or bright lamp behind you. You'll turn into a silhouette.
- Turn off overhead lights if they cast shadows under your eyes.
- A ring light or small LED panel is an inexpensive upgrade. If you wear glasses, raise it a bit and angle it to the side to keep the glare out of your lenses.
- A quick pat with a tissue takes the shine off your forehead.
Audio
- Use an external microphone if you have one. A USB desk mic just below the frame or a small clip-on lavalier mic keeps you sounding close without anything big in the shot. Then make sure it's actually selected in your recording software's audio settings.
- Avoid Bluetooth earbuds as your microphone. They compress your voice and can cut out mid-sentence.
- Nobody needs to wear headphones on camera. To keep other speakers' voices from echoing into your mic, turn your computer speakers down to a comfortable level and leave the platform's echo cancellation on. If you still hear echo in the dry run, a small wired earbud in the ear away from the camera does the trick without being noticed.
- No external mic? Use a quiet, soft room. Rugs, curtains and couches soak up echo. Bare walls and hard floors bounce it around.
Internet and computer
- Plug into ethernet if you can. If not, sit close to your router.
- Ask others in the house or office to pause big downloads and streaming during the recording.
- Restart your computer beforehand, close every app you don't need and turn on Do Not Disturb.
- Plug in your laptop. Battery-saver mode can lower video quality.

Light up your inbox, join our mailing list for updates from our team.
Step 3: What to wear
The basics are below. For the full rundown on colors, patterns, glasses, makeup and jewelry, see our guide to clothing and appearance for filming.
- Business casual. Solid colors photograph best. Blues, greens, burgundy and earth tones are safe bets.
- Avoid small patterns like pinstripes, tight checks, houndstooth and tiny polka dots. They shimmer on camera.
- Avoid pure white and pure black. Cameras struggle with both.
- Skip big logos, hats, T-shirts and hoodies.
- Leave off jewelry that jingles or taps a microphone.
- If you have to use a green screen or virtual background, don't wear green.
Step 4: Zoom recording settings
If you're recording in Zoom, the host should set these up before the dry run. The goal is to get separate files for each view and each person so the editor has options.
- Sign in to the Zoom web portal.
- Go to Settings. Account owners and admins can set this for the whole account under Account Management > Account Settings, or for a group under User Management > Groups.
- Open the Recording tab.
- Turn on Cloud recording and check these boxes:
- Record active speaker with shared screen
- Record gallery view with shared screen
- Record active speaker, gallery view and shared screen separately (check all three)
- Record audio-only files: one file for all participants and a separate audio file of each participant
- Save chat messages
- Optimize the recording for 3rd party video editor
- Create audio transcript
- Save closed caption as a VTT file
- Leave Add a timestamp and Display participants' names unchecked. Burned-in text can't be removed later.
- In the Meeting tab, turn on HD video. Some Zoom plans cap cloud recordings at 720p no matter what, so check with your Zoom admin if you need 1080p.
- Click Save.
A few more Zoom tips:
- Record to the cloud, not your computer, so a crash or full hard drive doesn't take the recording with it.
- Do a two-minute test recording and look at the files. Zoom's separate audio files don't always show up the way the settings promise, and you want to find that out before the real thing.
- Keep a passcode on shared recordings and send the link and passcode to your editor together.
Step 5: Riverside tips
- In your studio settings, choose the highest video quality your plan allows and keep audio as WAV.
- Each speaker should join from a desktop or laptop in Chrome, with a wired connection if possible.
- Have everyone close other tabs. Local recording uses a lot of memory.
- When you stop recording, nobody closes their browser until their upload says it's finished. This is the most common way remote recordings go missing.
Recording with a phone or tablet
- Set the camera to the highest resolution, 4K or 1080p, at 30 frames per second.
- Shoot horizontal (landscape), not vertical, unless you've been asked for vertical.
- Use a tripod or prop the phone on a stack of books. Don't hold it.
- If someone is helping you, use the back camera. It's sharper. Recording solo, the front camera is fine so you can check your framing.
- Tap and hold on your face to lock focus and exposure so the picture doesn't pulse when you move.
- Turn on airplane mode or Do Not Disturb so a call doesn't end your take.
- Make sure you have plenty of storage and the phone is charged or plugged in.
- No external mic? Keep the phone within about three feet of you.
Step 6: Do a dry run
Run it exactly like the real thing: same room, same outfit, same settings, same order of speakers. Then check:
- The host's recording settings are right.
- Every speaker's background and lighting look good.
- Every speaker's audio sounds clear, with no echo, hum or Bluetooth crackle. Listen for echo when two people talk back and forth.
- Screen sharing works and slides are readable in the recording.
- All the files actually recorded: video, audio and captions. Open them and watch a bit.
Fix anything that looked or sounded off before the real recording, not after.
Step 7: Recording day
- Restart, close apps, turn on Do Not Disturb, plug in.
- Check your mic is selected and your camera is at eye level.
- Record about ten seconds of silence at the start. Editors use it to clean up background noise.
- If anyone is recording on a separate device, like a phone, clap once on camera at the start so the editor can sync everything.
- Wait a beat after the recording starts before you speak, and a beat after you finish before you stop.
- Flubbed a line? Pause, take a breath and start the sentence over. Don't stop the recording.
- Relax and smile. It's a conversation, not a deposition.
Step 8: After you hit stop
- Download every file: each speaker's video, the separate audio files, the caption or transcript file and the chat.
- Rename them so anyone can tell what's what, for example 2026-11-10_WebinarTitle_SpeakerName_video.mp4.
- Upload everything, plus your slides, to the shared folder your editor or producer gives you.
- Leave time for the edit and review. A clean, branded webinar with captions usually takes a week or two from upload to ready-to-post, depending on how many review rounds you need.
- Want short clips for social too? Tell your editor before the edit starts. Here's how to turn one recording into many videos.
Common questions
Do I need to buy equipment?
No. A laptop, a window and a quiet room will get you most of the way. If you buy one thing, make it a USB microphone. A light is a close second.
Zoom or Riverside?
Zoom for internal and quick-turn content. Riverside, or another local-recording tool, for anything public where quality matters.
Can I use a virtual background?
Only if it's an approved, simple background your company provides. A tidy real room almost always looks better.
What if my internet drops?
With a local-recording tool, your recording usually keeps going and uploads when you reconnect. With Zoom, the recording drops with the connection, which is one more reason to plug in.
Want it to look like a studio shoot?
Some webinars and executive messages deserve more than a webcam. Our crews can show up at your office or a speaker's home with cameras, lights and audio, record a remote session professionally, or edit what you've recorded into something polished. Tell us what you're working on.


